> ## Documentation Index
> Fetch the complete documentation index at: https://docs.poble.com.au/llms.txt
> Use this file to discover all available pages before exploring further.
# Arrange the POS Menu Layout
> Arrange categories and item buttons to suit the way your staff work.
Arrange categories and item buttons to suit the way your staff work.
**Where:** POS device → Menu Management → Menu Layout
Select **Menu Layout** in the menu management sidebar.
Review **Preview Mode**, **Select Layout Type**, and **Font Size**. Use **Manage Groups** when you need to manage the displayed groups.
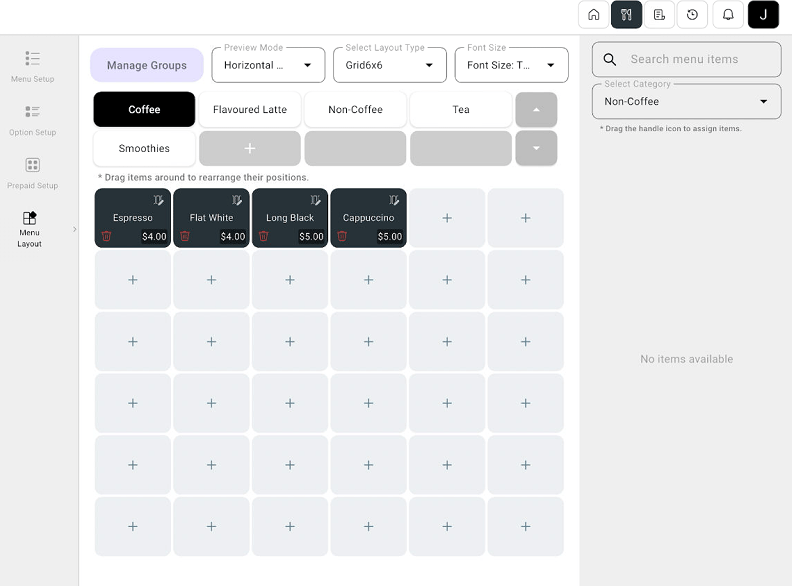 Select the group you want to arrange. Drag item buttons to change their positions. Use the item search and category selector to find items for the layout.
Check the category order and item positions in the preview. Apply any changes using the controls available on the screen.
Place frequently used categories and items where staff can find them quickly.
## Related guides
* [Create POS menu categories](/poble-manual/menu-management/pos/create-categories)
This documentation is built and hosted on [Mintlify](https://mintlify.com), a developer documentation platform.
Select the group you want to arrange. Drag item buttons to change their positions. Use the item search and category selector to find items for the layout.
Check the category order and item positions in the preview. Apply any changes using the controls available on the screen.
Place frequently used categories and items where staff can find them quickly.
## Related guides
* [Create POS menu categories](/poble-manual/menu-management/pos/create-categories)
This documentation is built and hosted on [Mintlify](https://mintlify.com), a developer documentation platform.