> ## Documentation Index
> Fetch the complete documentation index at: https://docs.poble.com.au/llms.txt
> Use this file to discover all available pages before exploring further.
# POS 메뉴 레이아웃 배치
> 직원의 작업 방식에 맞게 카테고리와 상품 버튼을 배치합니다.
직원의 작업 방식에 맞게 카테고리와 상품 버튼을 배치합니다.
**경로:** POS 기기 → Menu Management → Menu Layout
메뉴 관리 사이드바에서 **Menu Layout**을 선택하세요.
**Preview Mode**, **Select Layout Type**, **Font Size**를 확인하세요. 표시할 그룹을 관리하려면 **Manage Groups**를 사용하세요.
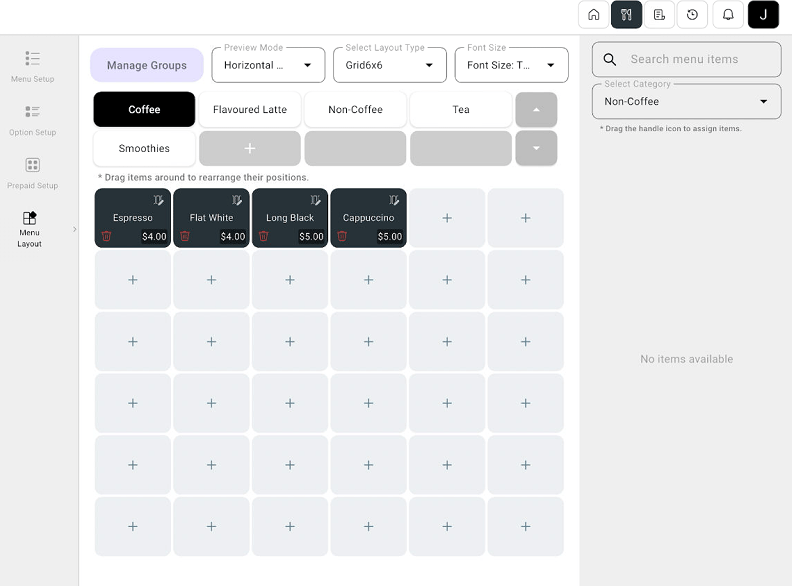 배치할 그룹을 선택하고 상품 버튼을 드래그해 위치를 바꾸세요. 상품 검색과 카테고리 선택기로 배치할 상품을 찾으세요.
미리보기에서 카테고리 순서와 상품 위치를 확인하고 화면의 버튼으로 변경 사항을 적용하세요.
자주 사용하는 카테고리와 상품은 직원이 쉽게 찾을 수 있는 곳에 배치하세요.
## 관련 가이드
* [POS에서 메뉴 카테고리 만들기](/ko/poble-manual/menu-management/pos/create-categories)
This documentation is built and hosted on [Mintlify](https://mintlify.com), a developer documentation platform.
배치할 그룹을 선택하고 상품 버튼을 드래그해 위치를 바꾸세요. 상품 검색과 카테고리 선택기로 배치할 상품을 찾으세요.
미리보기에서 카테고리 순서와 상품 위치를 확인하고 화면의 버튼으로 변경 사항을 적용하세요.
자주 사용하는 카테고리와 상품은 직원이 쉽게 찾을 수 있는 곳에 배치하세요.
## 관련 가이드
* [POS에서 메뉴 카테고리 만들기](/ko/poble-manual/menu-management/pos/create-categories)
This documentation is built and hosted on [Mintlify](https://mintlify.com), a developer documentation platform.